
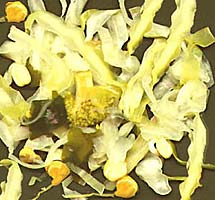
Kefirkraut is a low sodium sauerkraut that is similar to, but superior to, traditional sauerkraut, I feel, and so do the many individuals who have testified to this. The reason being that sauerkraut is traditionally prepared by the fermentation of fresh, shredded cabbage with the addition of 2% to 3% salt. In this case, common sauerkraut normally takes between 3 to 6 weeks to culture, because salt heavily retards the fermentation process.
On the opposite side of the chopping board however, kefirkraut is cultured with the addition of kefir grains incorporated as a starter-enhancer. This permits the culture-process to proceed much more rapidly and efficiently in comparison, and without the use of any salt, or, a small percentage of salt just for taste or to extend shelf life may be used, if desired. The culture-product can be tailor-cultured to suit personal preference of the Kefirkraut-Master. Since incorporating kefir grains influences a more rapid fermentation this produces culture-vegetables with optimal nutritional value, for oxidation of nutrients is minimised. I would not be surprised if similar to many kefir recipes, kefirkraut may too produce the powerful antioxidant common to milk kefir, soy milk-kefir and rice milk kefir, as research has shown. Previous scientific research has shown that kefir ferments used on vegetable over time, reduces nitrate and nitrite levels, which is a very good thing. My recipe explained here would make an interesting area for further research, nonetheless.
Kefirkraut may be regarded as a vegetable probiotic source, low in carbohydrates, rich in Lactobacilli, Yeasts, Vitamin U [only found in cabbage] and Vitamin C including some of the B group vitamins bio-synthesised by the friendly organisms native to kefir grains, and to fresh cabbage including any other fresh vegetables used in any given kraut recipe.
The native microflora found on cabbage leaves is evident as a powdery film, covering the surface of the outer leaves. This film causes the interesting phenomenon, which I refer to as, water running off of a duck’s back. This effect is observed by pouring water over the surface of cabbage leaves. The water is repelled forming water beads, which readily roll off the leaf. This protects the native microflora from being damaged or washed away in wet conditions.
Kefirkraut was conceived through the union between the native microflora of fresh vegetables and kefir grains, the marriage of which was blessedly united by the power invested in yours truly.
Recipe for Making Low Sodium Sauerkraut
Utensils and Ingredients
Fermentation Vessel – A large non-metallic 4-litre [1 gal] tall round or square container e.g., a food-grade glazed terra cotta crock or glazed stoneware crock or a glass jar.
Mortar and pestle or food processor to bruise the cabbage.
Large wooden-dowel. It can be e.g., a wooden rolling pin with one end sawn off square, or similar. It is best for the wooden dowel to be a little longer than the height of the fermentation vessel. This is your pounding tool if a mortar and pestle or food processor is not available or not preferred. Or, it can be your pressing tool if using a mortar and pestle or food processor to cut up the fresh ingredients.
A Follower. This is to cover the ingredients. Either a round flat dish or a wooden disk which fits snug in the fermenting vessel. However, this may be omitted if you use a suitable weight source.
About 1kg [2Lb] weight e.g., a large clean stone, or a large bottle or jar filled with water. If an appropriate wide enough jar is used, it can replace the follower called for above.
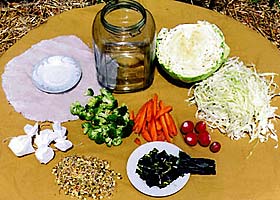
One medium to large fresh organically grown cabbage with outer dark green leaves left intact.
Optional ingredients One Japanese radish [Daikon], or a bunch of small red round or long radish. One medium size carrot. One medium head of broccoli and or cauliflower. 2 large mustard green leaves. A hand full of either rocket, parsley or cress or a combination. A few young tender broad bean plant tips, including 1/2 cup fresh broad beans. 4 to 6 celery stalks. 1 medium size beet root. 1 cup sprouted legumes or seeds e.g., mung bean, soybean, lentil, alfa-alfa, cress or any combination. 1/2 Tbs each of caraway, dill and celery seed or fennel seed. About 12 juniper berries.
2 Tbs milk kefir-grains or 4 Tbs sugary kefir-grains. Use fresh excess or spare milk or sugary kefir-grains.
Liquid. Fresh water-kefir, Or fresh vegetable juice or fruit juice or a mixture of all or any. [The liquid is to cover the vegetables in the fermentation vessel during fermentation. About 1 to 3 cups of liquid depending on quantity you’re making and size of crock and amount of bruising done to the cabbage– the more bruising lesser liquid required].
Preparing the Ingredients
Remove any damaged large outer leaves from the cabbage. Keep two of the outer dark-green leaves and wash well with fresh water. Cut whole cabbage in half and remove hard centre core with a sharp knife. Shred cabbage to about 1/2cm [1/4″] thick long strips.
Mortar and Pestle Method for Bruising Cabbage Pound a handful amount of shredded cabbage in a mortar with a pestle to bruise, until its own juice is released when a portion of bruised cabbage is squeezed in the hand. Pound small amounts at a time, placing each bruised portion in a large bowl, until all the cabbage has been processed.
Electric Food Processor Method for Bruising Cabbage Put an amount of shredded cabbage in electric food processor and process as low speed for a few seconds until bruised and a little juice is released from the cabbage. Do not over process otherwise you will be left with a mush. Put in a large bowl, and process another small amount like so, until all the cabbage is processed.
Wooden Dowel Method for Bruising Cabbage Fill fermenting vessel 1/3 with shredded cabbage. Pound the cabbage with wooden dowel until cabbage is well bruised and a little juice is released. Put bruised cabbage in a large bowl. Process the remainder of shredded cabbage as explained.
Optional veggies may be used whole, if no larger than about 2cm [1″] in thickness. Cut to size as required e.g., cut large daikon radish, carrots and whole beet root julienne style. Small round radishes may be included whole or cut in half or quarters. Broccoli/cauliflower heads need to be removed from the main stalk and separated into small individual Florette’s. Small heads may be added whole or bruised by mortar and pestle or dowel method explained above. The same goes for sprouted seeds or legumes. Except for the kefir grains, mix all ingredients together in a large bowl.
Filling the Fermentation Vessel
- Place 1/2 amount of kefir grains at the bottom of the container. Begin filling the container with vegetable ingredients. Press each layer down with a wooden dowel, or with a clenched fist until well compressed. Keep adding ingredients and compress until 1/2 the ingredients remain, and then evenly place the remaining kefir grains over the surface of the compressed ingredients.
- Keep adding and compress more ingredients until 3/4 volume of fermenting vessel remains in-compressible.
- Place 1 or 2 washed outer whole cabbage leaves over top layer of compressed ingredients. Try forcing edges of the leaves down the sides of the container using a wooden spoon. This is to cage or seal the ingredients contained beneath.
- Place a plate or wooden disk on top of the cabbage leaves, then place the weight on top of this. Note that if an appropriate wide enough weighting source is used, then there is no need to place a plate or wooden disk, for the jar or weight may be enough to hold down the ingredients so the ingredients do not escape and float during initial fermentation at room temperature.
- If the ingredients are not completely submerged under juice, add enough water or fresh fruit such as apple or vegetable juice [or a mixture] until the plate is covered by about 2.5cm [1″] of liquid. However, if the ingredients were well bruised, there should be enough juice to cover the contents once the weight is put in place in step 5 above.
- Place a plastic bag over the container to keep out air, dust and insects. The bag may be secured with string or with an elastic rubber band placed around the fermentation vessel.
Let the container sit undisturbed in a cupboard or in a root cellar. On day 3, check the surface of the liquid for signs of scum seen as froth or foam [or possibly kahm yeast] and remove this by skimming with a spoon. However, in most cases kahm yeast should not form when kefir grains are used as a starter-enhancer, for the expedient fermentation does not allow such yeasts to form.
The kefirkraut should be ready for cold storage in the fridge at day 4 to day 5.
For the technical minded folks or tech-heads out there, readiness can be determined by testing for pH using litmus paper, or a digital pH meter [obtained from chemical suppliers, Hydroponics agriculture suppliers, or swimming pool equipment suppliers]. The pH should be 4.5 to 4 [mildly acidic]. This is when the kefirkraut is ready for ripening under cold storage [refrigeration].
Experience suggests that during summer months kefirkraut is ready at day 4, and day 5 during winter.
Remove the weight and disk or plate. Seal the container with a lid, and then place the container of kefirkraut in the fridge. If the crock it too large to fit in the fridge, transfer the kefirkraut with all the liquid into suitable containers with good secure lids, and refrigerate. The ingredients should be submerged under liquid at all times. If the contents are not covered by liquid, add a little fresh water or fresh vegetable juice, adding enough to just cover the ingredients [not too much juice or water though, Dear Liza].
Kefirkraut should be ready for consumption after ripening in the fridge for 4 to 7 days. Although kefirkraut may be consumed from day one, ripening improves overall flavour, similar to the aging of wine. Ripening also increases some B group vitamins.
Refrigerated salt less kefirkraut should store well for 3 to 4 months.