
It’s always a good idea to have back up, correct? This is also true with kefir grains, because you never know when you’ll need them. One day, you may end up feeling glad you create that back up, or, regret that you never did! It’s in your hands.
Freezing Kefir Grains, both water and milk kefir-grains
One method for storing kefir grains for periods of up to 2 months, is by freezing spare grains. To freeze effectively, wash the grains with pre-boiled COOLED water. Pat-dry the grains between pre-ironed cooled white toweling to remove excess moisture. Place the grains in a jar or in a plastic bag, seal and put in the freezer. With milk grains, first add some dry milk powder, [DMP] adding enough to completely cover the grains with the DMP, seal jar or bag and then freeze. DMP is mixed with the milk kefir-grains as a cryoprotectant agent to prevent freezer burn. Although I’ve found that kefir grains are viable for up to one year with this method, this length of time may completely remove the yeast component found in healthy kefir grains [if frozen for longer than 2 months, but not specifically]. Because of this potential, freezing kefir grains as explained above, is best performed for a period of no longer than 2 months. If DMP is omitted for freezing milk kefir-grains, then a period of no longer than 1 month is recommended. Otherwise the yeast component of kefir grains may become damaged, especially if continual partial thawing and freezing due to poor freezer mechanism is involved.
Note, do not add fresh milk or other water-based liquid with kefir grains meant for freezing, for the water will rupture many of the organisms, destroying the organisms during freezing. This is because water expands at 0 deg. C or freezing point.
Drying Milk Kefir-Grains
Kefir grains may be dehydrated for long term storage for up to 18 months.
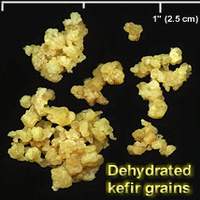
To dehydrate fresh kefir grains, rinse the grains with pre-boiled COOLED water. To remove excess moisture, pat-dry the grains between a pre-ironed cooled white terry towel, or simply let stand on the toweling for 1/2 hour to absorb excess moisture from the grains. Place the grains on a sheet of clean nylon cloth that is stretched over and stapled down over an empty wooden picture frame. Place another layer of similar material over the grains to prevent dust and insects from falling on the wet grains, and tack the material down with thumb tacks to the wooden frame. Dry the grains in a well ventilated warm spot, until the grains become brittle. Water kefir grains will dry clear to light brown large sugar crystals, depending on type of sugar used for the water kefir. Milk kefir-grains usually dry and become yellow.
Depending on temperature, humidity and size of each grain, drying may take between one to two days for water kefir-grains. I takes about 2 to 4 days for milk kefir-grains. Dry all the grains well to completely dehydrate. Place the dry grains in an airtight sealed jar and store in the refrigerator [do not freeze]. I add a little dry milk powder with dehydrated milk kefir-grains, adding enough powder to completely cover the grains in a jar or in a Ziploc plastic bag. Dehydrated kefir grains may be stored for up to 18 months. Although I’ve discovered that my method of adding dry milk powder, dehydrated milk kefir-grains can remain viable for up to 6 years! Although only a small number of grains may end up fully reactivating to propagate when reconstituted after this time.
NOTES It is not imperative to pre-iron any toweling for the drying process explained above. However, it is wise to pre-iron any material that comes in direct contact with the grains, to reduce the risk of contamination. I recommend to replace any back-up supply of dehydrated kefir grains with freshly dehydrated grains every 6 months, just to be on the safe side. The previous batch of dehydrated grains make great treats for both folks and pets alike. They also can be fashioned into powder by grinding, and mixed the powdered grains with your favourite seed spice powders such as anise, fennel, caraway or coriander seeds, with an amount of sea salt or non-sodium salts to taste. This prepares a savoury probiotic condiment. Or, powdered dry kefir grains mixed with maltose e.g., and cinnamon powder for a probiotic sweet dressing. With these basic example, I’m certain you can come up with something you like, and if you have children, they too may enjoy a probiotic in a number of different ways.
Reactiving Back Up Kefir Grains
These milk kefir-grains originated from the same batch. The grains on the left were frozen for 2 months, while the grains on the right were dried for 6 months. These are 1 month after reconstitution under parallel culture-conditions. Note how well the frozen grains have reconstituted compared to the grains on the right.
Reactivating Frozen Kefir Grains
To reactivate frozen kefir grains, thaw by placing the grains in a glass filled with cold water for a few minutes. Place the grains into a strainer and wash off any powdered milk that’s adhered to the grains with cold water… presto pronto!!.. they’re ready for action and reaction… heheheee.
Now, add fresh milk to the grains with a ratio of 1 : 3 grains-to-milk by volume [say 1/2 cup of milk to 2 Tbs of grains]. Strain off the milk every 24 hours, whether or not the milk has coagulated, then place the grains back in the jar with more fresh milk. When full coagulation of milk occurs within 24 hours of fermentation, your kefir grains have reestablished themselves. At this point in time the milk should smell sour but clean, with a possible aroma of fresh yeast. This could take up to one week and in some cases longer. The quantity of milk may be increased to one cup, and again by another 1/2 cup after every other batches, until you’re happy with the amount of kefir produced. After an increase in milk volume, do not increase again until the grains are able to ferment the previous increase within 24 hours. This may take between two to seven batches, depending on many factors e.g., how much you increased milk by, temperature and the activity of the grains themselves.
Reactivating Dehydrated Kefir Grains
First reconstitute dry kefir grains by placing the dry grains in a jar with the addition of a glass of fresh milk. Activate by renewing the milk daily after straining that batch, whether the milk has coagulated or not. Do not drink this milk until it produces a clean, sour aroma. Reconstituting dry grains may take between four days and in some cases up to one and a half weeks to occur. When the milk starts to coagulate within 24 hours, producing a clean, sour aroma, with a hint of fresh yeast, your grains have reactivated and are rearing to go!
NOTES When activating dehydrated kefir grains, for the first few days the milk will go through some unusual stages, regarding appearance and aroma. The milk will initially produce a predominance of friendly yeast activity, evident as froth or foam forming on the surface of the milk. Yeast activity may reach a peak after 3 to 5 days, then subside as consecutive batches are cultured thereafter. As consecutive batches are cultured, the microflora should find a balance between the bacteria and yeast components, which kefir grains can achieve quite naturally on their own. This may take between 1 to 2 weeks.
Growth rate of kefir grains may not be evident, in some cases, until the third week, or even longer. The grains should become whiter in colour after each consecutive batch. Any yellow or yellow-pink-brown grains that don’t have an elastic property, should be removed from the batch after the forth week. These are non propagable grains [do not grow], the portion of which is determined by length and storage conditions and dehydration method.
Non propagable grains disintegrate when squeezed between two clean fingers, having the texture similar to a Cheddar cheese. Whereas propagable grains are white and elastic with a slightly slimy feel [Kefiran], when gently squeezing a grain between clean fingers.