
Making Kefir Cheese: The Basics
There are a few basic steps for producing cheese, all which share one thing in common, and that is the coagulation of fresh milk to produce curds and whey, the whey portion if which is separated, leaving the curd or fresh cheese. This is where kefir comes in to play. Kefir may be used in two ways to produce wonderful cheeses of many types:
By straining ready-to-drink liquid-kefir through a tightly woven cloth to drain the whey [kefir-whey] from the curd or casein. This produces a condensed fresh sour-curd, a creamy cheese which I’ve named Kefir-Leban. This variety of sour-curd may be enjoyed fresh, or used as a base for producing many varieties of soft or hard cheeses, semi-matured or matured cheese inclusive. This also includes molded cheese types, such a Blue, Brie and Camembert varieties.
Alternatively, kefir may be implemented as a simple coagulant to coagulate fresh warm, or hot milk, and as a substitute for rennet, the common enzyme used to coagulate fresh milk to give a sweet, non acidified curd through draining the coagulated milk to separate the sweet or non acidic whey. This method produces the more traditional or more common varieties of fresh-cheese e.g., a sweet fresh curd cheese similar to cottage cheese and ricotta. From this basic sweet fresh curd, many varieties of cheese may be prepared. I find using kefir in this fashion produces cheese with a fine texture and wonderful mellow flavour, enjoying a long shelf-life.
All the cheese recipes explained here are 100% rennet free all of which are my own creations.
One of the cheeses explained here is a recipe for a fresh cheese-dip; the versatile Kefir-Straightjacket. This is simply a dip that can be used as a spread, a mayonnaise substitute and much more. Kefir-SourCream which can be prepared similar to the Italian variety known as mascarpone, or Russian Smetana. A Kefir Butter is also explained. Also Kefir cottage cheese, a sweet curd similar to ricotta, having a firm, dry, soft granular texture. Later down-under this page, I’ve included ideas for many varieties of cheeses that can be prepared from kefir. Those familiar to cheese making should find the ideas quite easy to follow. In fact, a novice to cheese making should find the recipes reasonably easy to follow. After all, I am by no means a cheese making expert, and with this being the case, I’ve been able to create cheeses from kefir, which was probably unthinkable only 10 years ago. Since the hard work has already been initiated, all one has to do is follow the steps explained here on this page.
It was experimentation that brought all the wonders explained here to light, and experimentation is what I try to encourage. So, if you try your hand at any recipe mentioned here and you feel they are a flop, rethink again, for all you’ve really done is to extend in some direction or another, on the recipe or idea.
Kefir-Leban
The flavour and texture of Kefir-Leban is similar to kvark [quark], or, the condensed yogurt-type curd Lebneh of the Middle East. Kefir-Leban is a base from which not only dips such as the Kefir-Straightjacket dip below can be created, but many varieties of cheeses from pure kefir can be made from the fresh sour curd. It can be used in recipes calling for sour cream [as a low fat alternative], cottage cheese, cream cheese, kvark or philadelphia cheese etc. Kefir-Leban makes a superb cheesecake substituting cream cheese or cottage cheese in any cheesecake recipe.
Ingredients and Utensils
Prepares about 350gm or 3/4lb cream cheese [Kefir-Leban]
- 4 cups milk-kefir that is not too sour.
- White cotton, linen or silk cloth with a tight weave – loose woven material such as cheesecloth is not suitable. Pillow case or handkerchief type material is excellent.
- About 60cm [2ft] strong string.
- 4 to 8-cup wide bowl to collect kefir-whey as it drains from the kefir.
Method
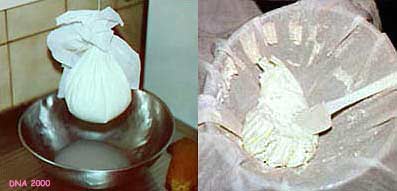
- Place pre-moistened cloth in a large bowl or strainer or a colander.
- Pour 4 cups kefir into the cloth.
- Gather end corners of cloth lift them and tie with string to create a bag.
- Hang bag as shown in picture, and then place a suitable container beneath it, to collect the dripping kefir-whey.
- Let drain for 24 hours. Open up bag and transfer the Kefir-Leban [fresh sour-curd cheese] to a clean bowl. If still too wet and sloppy, fold the kefir-leban in the bowl. Wash the cloth, and then return kefir-leban back to the cloth. Tie cloth and hang to drain for another 24 hours.
Remove the Kefir-Leban and transfer to clean, seal-able container.
The Kefir-Leban can be consumed fresh, or refrigerated in a sealed container. Kefir-Leban may also be pressed in a suitable cheese form for 24 to 36 hours, from which a variety of semi-mature or mature cheese can be prepared. Or follow the next recipe below to prepare the delicious and versatile Kefir-Straightjacket dip.
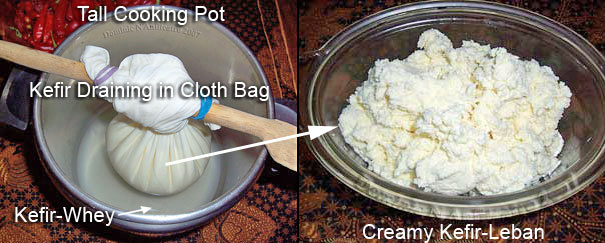
The photo above shows another idea for preparing Kefir-Leban. This is by securing the bag containing the kefir onto a wooden spoon with string or elastic rubber bands and then placing the bag over the mouth of a large tall pot, so that the bag hangs a few inches from the bottom of the pot. The pot collects the kefir-whey as it drains from the kefir. After 24 to 36 hours draining, the bag is opened and the Kefir-Leban is transferred to a bowl. You should be left with a beautiful soft fresh cheese as shown on the right.
By the whey, kefir-whey makes a delicious refreshing beverage, so please consider not wheysting kefir-whey or throwing it awhey. It is rich in Methionine and Cystine, the health-promoting sulfur-containing amino acids the latter of which helps to produce the master antioxidant Glutathione in the liver. At the very least, if you have a garden, kefir-whey makes a fantastic high yielding liquid fertilizer for vegetables, herbs, other plants and fruit trees.
Acidity or Sourness of Kefir for Kefir-Leban
It is usually best to begin with a mild kefir, one that is not overly sour for preparing Kefir-Leban for kefir cheese making in general. This produces Kefir-Leban with a mild flavour, from which a variety of semi-mature/mature cheese with a mild flavour are prepared. However, wonderful variations of cheese can also be prepared with an excessively sour kefir. An overly sour kefir may occur if kefir is accumulated and stored in the fridge while adding more kefir regularly to the container. However, preparing Kefir-Leban with an overly sour kefir, and maturing the Kefir-Leban in a sealed container in the fridge for 2 to 3 months, reduces the sourness of the cheese. This is due to the action of yeasts. So even an initial overly sour kefir for preparing Kefir-Leban can be used, for creating aromatic, fruity cheeses quite similar to Parmegiano or Parmesan, but processed in a much shorter time compared to the traditional counterpart. So, not all is lost with an extra sour kefir, but with little time and patience, something exceptional is gained.
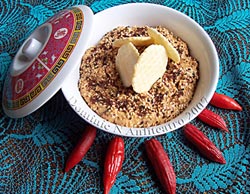
Kefir-Leban Rounds Kept under Extra Virgin Olive Oil

Wonderful small rounds of Kefir-Leban fashioned into balls by rolling an amount of Kefir-Leban by hand can be put into glass jars and filling each jar with extra virgin olive oil. The jars are sealed airtight and the rounds of cheese will keep for quite some time, years in fact. In Egypt and the Middle East Lebneh is stored under oil like so, for long term storage.
Recently, I tested two 10 year-old batches. One batch had a flavour of well aged blue cheese– it had a wonderful, clean strong bite with a very smooth texture. Another batch did not have the blue cheese-like flavour, it was more like the original Kefir-Leban but with a mature flavour. These differences were produced due to the amount of moisture of Kefir-Leban and sourness of the original kefir for preparing the Kefir-Leban. The less sour kefir for preparing Kefir-Leban, the latter of which was partially dry for a few days before putting under oil, was responsible for the blue-cheese flavour. While the more sour kefir that prepared Kefir-Leban which was not dried after shaping, produced the latter milder flavour.
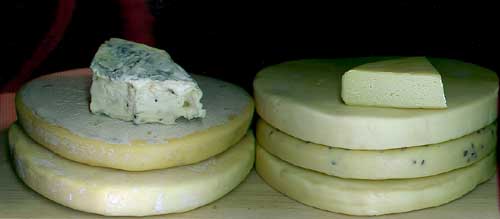
Note, in the photo, the jar [top centre] is Kefir-Leban under EV Olive oil. Some of the Kefir-Leban was fashioned into balls while others are disks, all made by hand. There’s also creamy Kefir-Blue cheese [far bottom left] and a mature cheese sealed in beeswax. The labeling is in Italian.
As an end note, my understanding of traditional Lebneh on Egypt or the MIddle East is that the rounds of curd kept under oil is not usually stored for longer than about 12 to possibly 18 months, for the cheese or the storage oil turns rancid. However, it appears if using kefir for preparing Kefir-Leban kept under oil keeps for a much longer time. The oil too appears to keep longer. This may be due to the powerful antioxidant found in kefir, which I believe is not found in the culture milk-product used in the Middle East for making Lebneh. Some believe that Lebneh is drained yogurt. However, my understanding is that the culture milk-product for Lebneh has a yeast component similar to kefir, which is not found in yogurt. I find interest in how if milk is cultured in a fashion which includes yeast, similar to the Middle East product including Koumiss of Mongolia, such culture-milks do not appear to produce such an antioxidant. It appears that only kefir grain-fermented milk [kefir] produces such an antioxidant. Does kefir rule?! or what?!
Kefir-Straightjacket Dip
Prepared with Kefir-Leban Above
Kefir-Straightjacket [KS] is a fresh sour-curd dip, prepared from Kefir-Leban. Kefir-Leban and Kefir-Straightjacket are nutritious and highly digestible. If you are curious about the name Kefir-Straightjacket, the name was a spontaneous conception and for two reasons: While preparing Kefir-Leban, the kefir appears to be in a Straightjacket, and Individuals have gone crazy asking for more KS… right before our eyes.
Like all Kefir-Leban based products, these too enjoy exceptionally good keeping quality and should keep for some months refrigerated in a sealed container. Although, the fashion in which we scoff the stuff down under, it hardly lasts longer than a few days.
Now, for the Straightjacket …
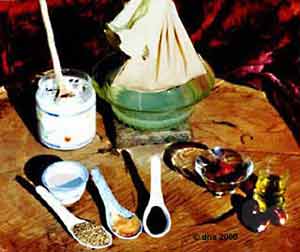
Ingredients for the dip
- 2.5 cups Kefir-Leban [recipe above]
- 2 sun dried tomato pieces or semi dry tomatoes in oil.
- 5 large or 8 small black olives.
- 2 Tbs unhulled sesame seeds for Gomashio [Most Asian grocery stores or Chinese herbalists sell whole black sesame seeds, which are good for this recipe. A good Health Food outlet should carry tan, unhulled sesame seed].
- 4 Tbs fresh chives.
- 1/4 cup extra virgin olive oil or virgin coconut oil.
- 1/2 Tbs either preserved or fresh green ginger root.
- 2 Tbs either Mirin, Sake, or white wine.
- 1 Tbs natural non-pasteurised organic soy sauce or 1/2 Tsp sea salt.
- 1/4 Tsp ground white or black pepper.
- 2 cubes plain or sesame and chili flavoured Sufu [optional].
Step 1 Preparing Gomashio [Japanese sea salt toasted un hulled sesame seed condiment]
Preparing your own Gomashio. Place sesame seeds in a bowl filled with fresh water, stir and then quickly pour into a strainer. Do not pour the whole contents, leave a small portion in the bowl for there may be some small stones or sand in the sesame seeds.This will settled at the bottom of the bowl. Let drain well, then put seeds on clean terry towel and pat dry. Add sesame seeds to a pre-heated very hot skillet with 1/2 tsp raw, unrefined sea salt. Stir continuously to mix salt and prevent seeds from burning. When the seeds begin to pop, place a lid on the skillet and shake pan from side-to-side every few seconds to prevent burning the seeds. When seeds almost stop popping and turned golden brown in the centre, quickly pour seeds into a bowl to cease toasting. This is your Gomashio. You can make more Gomashio than suggested here. Gomashio is a healthy condiment and a good substitute for regular table salt. This is because the hulls of un hulled sesame seeds are the richest source of calcium, which can prevent or counteract the ill effects of sodium in sea salt on the body.
Step 2
Chop dried tomato to about 2mm [1/4″] square pieces. Cut olives into very small pieces. Slice fresh chives fine. Chop fresh or preserved ginger root into very small pieces, or pound to a paste in a mortar and pestle. Place Kefir-Leban in a deep dish and fold in all the ingredients [except for 1/2 Tbs of Gomashio which is used to Garnish the dip]. That’s it! I’m out o’ here…..
I’m back again! I’m not that easy to get rid off, you know! This dip improves over time stored in the fridge for a few days. This is because the flavour of some of the ingredients are released and get to mingle throughout the dip.
As the picture demonstrates, Kefir-Straightjacket dip brings together and intermarries three cultures, Caucasian, Japanese and Italian to create a versatile fresh dip. In this photo, kefir is draining in a 60 year-old hemp bag to prepare Kefir-Leban. The hemp fibre used to fashion the bag, was initially made by my mother in Italy, during the early 1940s. She grew and cured the hemp in her small village, then wove the material on a hand loom from hemp-thread spun by hand. Over the past years, the only detergent this bag has been washed with is wood-ash lye explained at my kefir making web page.
Rich in Calcium
If whole sesame seeds are used as a part ingredient, the calcium-rich hulls of whole sesame seed, is rendered into a more bio-available form. This is because although sesame seeds are the riches source of calcium among land vegetables, the calcium-rich hulls of raw unhulled sesame seeds is mostly locked and biologically unavailable [as Calcium oxalate]. However, although the toasting process for Gomashio neutralizes the oxalate form of calcium, continuous fermentation may further increasing the calcium’s bio-availability, if the dip is matured for at least 4 days in the fridge before served.
Keeping Quality
Kefir-Straightjacket keeps good for at least one month refrigerated in a sealed container. If the dip is folded with a clean spatula on a weekly basis, it should keep good for 3 months. The latter will also convert a sour dip, into a milder, less sour dip over time due to the continual action of kefir yeasts, if an excessive sour kefir was used to prepare the initial Kefir-Leban.
Tips for the Use of Kefir-Straightjacket and Variations
- As a dip or as a spread.
- As a side dish.
- A mayonnaise substitute.
- In burgers.
- Delicious as a pizza topping.
- Makes a wonderful white sauce mixed with pasta.
- Big dollops over baked veggies… hmm-hmm ever so yummy.
Among one of my favourite palette exciters is K-S with stir-fried mung bean sprouts and garlic, ginger, mirin and sesame oil on toasted kefir sourdough rye! A wealth-of-health snack, or meal-on-jet-skis-of-its-own-merit.
Nut Kefir-Leban Dip Try 1/2 cup raw or lightly toasted almond, raw walnuts, macadamia, cashew, pumpkin or sunflower seed kernels ground to meal in the above recipe. For an extra healthy treat, try 3 Tbs linseed freshly ground to meal. This will thicken the dip.
Kefir-SourCream or Smetana + Butter
Kefir-SourCream is quite simple and easy to prepare. It can be prepared similar in flavour and texture to traditional Italian Mascarpone, sour cream, or the Russian variant Smetana, with full body, rich creamy flavour, with a subtle bite and smooth texture. Depending on how rich you prefer Kefir-SourCream, you may use more or less cream in the recipe. Or strain for a lesser or longer time. This recipe prepares about 400gm [about 1lb] of Kefir-SourCream. It should keep good for at least one month refrigerated in a sealed container.
Ingredients
- 1 to 2 cups fresh whole milk [fresh raw milk is best].
- 1 cup fresh non thickened natural dairy cream [fresh raw cream is best].
- 2 to 4 Tbs milk kefir-grains, or, 1/4 cup freshly strained ready-to-drink liquid-kefir.
- 1/2 tsp sea salt.
Method
Mix fresh cream and milk together, then place in a jar with milk kefir-grains. Or add 1/4 cup kefir instead. Let stand at room temperature for 12 to 24 hours. Strain the rich kefir to separate the kefir grains [if using grains], mix in the salt and pour the rich kefir into a pre-moistened white cotton or linen cloth placed in a strainer. Tie ends of cloth with string to form a bag, then tie to hang bag onto something suitable. Place a container underneath the bag to catch the dripping kefir-whey. Drain for about 12 to 24 hours; depending on how thick or rich you prefer your Kefir-SourCream– the longer it drains, the thicker it becomes. Open the cloth bag and remove the Kefir-SourCream with a spatula or a spoon. Transfer to an clean container, seal airtight and refrigerate. To extend keeping time, fold the Kefir SourCream on a weekly basis, reseal the container and refrigerate.
Variation a Simplified Version
Instead of including milk, just use fresh cream. In a clean jar, to each cup of fresh cream add 2 Tbs freshly strained liquid-kefir. Place a clean lid on the jar, but do not seal the jar airtight. Let stand for 24 hours at room temperature. Seal jar airtight and refrigerate.
A delicious Tirami-su [Italian layered cream/coffee/liquor cake] can be prepared with Kefir-SourCream in place of Mascarpone.
Kefir Butter can also be prepared with Kefir-SourCream. This is best prepared with the simplified version above. Hand beat Kefir-SourCream with a spatula until the butter comes [granulation of milk-fat with the separation of buttermilk]. The milk fat-granules are further beaten to form a thick mass. The butter is washed with the addition of water with a few ice cubes, and then the liquid is poured off. More icy cold water is added, and the butter is folded and cut with a spatula with the cold water to further wash the butter of any buttermilk, which is again poured off. A little salt to taste may be added at this point and folded into the butter. The butter is placed on a wooden board put on a slant to let any water left in the butter drain away, as the butter is worked by folding and flattening with a flat spatula or with traditional Scotch Hands [see third photo in slide below] to force as much water out of the butter as possible. It is worked to form a block of fresh butter. Alternately, the butter may be put in a rectangular wooden form and pressed with a weight to form a block of butter. Wrap the butter in waxed paper and refrigerate. It should keep fresh for at least 4 weeks.

Kefir-Grain-Butter Variation I prefer souring fresh cream for butter-making especially, with a small amount of kefir blended with a portion of spare milk kefir-grains, or kefiraride or a mixture of both. I may use say 1 Tbs of milk kefir-grains blended with 1/4 cup kefir, or kefiraride in a food processor to form a creamy, smooth liquid. Or, simply use 1 cup kefiraride. The emulsion is gently folded into as much as 8 cups or 2 pints of fresh cream and cultured for 24 hours at room temperature in a covered bowl. The cultured cream is then churned as explained above. This reduces churning-time and the energy required for it usually takes less time for the butter to come, or to form. It also improves the keeping quality due to the antioxidant of kefir, with better texture, rendering the butter more easily to spread, with exceptionally improved health-promoting qualities. This is certainly another functional food created and forwarded by non other than yours truly. ENJOY!
Kefiraride [keh-fear a-ride] is obtained by storing milk kefir-grains in 2 to 3 parts fresh water for 12 to 24 hours, followed by straining. This may be done in the fridge or at room temperature. The strained slippery liquid rich in health promoting polysaccharide, kefiran is kefiraride.
Kefir Cottage-Style Cheese
There are other types of cheese that I prepared with kefir. Explained here is a fresh, sweet curd cheese, similar to cottage cheese or pannier of India. Kefir-cottage-cheese is quick and easy to prepare. Note that this is a rennet-free cheese like the majority of cheeses I prepare.
Ingredients
- 2 to 4 Lt [1/2 – 1gal] fresh milk [Any milk type with any fat content, including fat free milk].
- 1 to 2 cups kefir – 2-day refrigerated kefir or an extra sour kefir brewed for 2 days is best, although freshly strained not too sour kefir will also do.
Madness in the Method
- Heat milk to about 60°C [140°F].
- While gently stirring the milk, slowly pour kefir into the milk as a slow, steady stream. Do not stir too fast or vigorously or for too long or the curds will break apart and become unretrievable. The curds should begin separating from the whey– the whey should be reasonably clear and not milky. If the whey is milky, either increase the heat, or add a little extra kefir [while very gently stirring for a short time only] until the whey becomes reasonably clear. Let sit still for 2 minutes.
- Remove curds by skimming with a strainer.
- Place curds in either a premoistened cheesecloth lined colander, or in a suitable mesh-type strainer.
- Let curds drain for about 15 minutes. Presto pronto!… that’s it!
Variations and Tips
Fresh cottage-style cheese can be prepared at lower temperatures and with raw milk. For proper coagulation to take place, add the kefir to raw milk and let culture for 6 or so hours at room temperature of about 22°C. Very slowly begin to raise the temperature by heating the milk to 42°C [107°F] over a 15 minute period. This process is known as cooking the curd, but it should not be mistaken for actually cooking. The process is to make the soft curd firm enough so that the small curds do not break apart when skimming. This temperature will not pasteurized raw milk or destroy the important enzyme of raw milk. The latter occurs at 45°C, so as long as the milk is not heated above 42C, it will remain as raw milk. Curds should form firm without breaking apart into a mush or fall through the sieve when sieved out from the whey. If the curds break apart with a gentle stir, slowly raise the temperature of the milk a little, while stirring very gently. Then follow the steps above for draining the curds [step 4]. You really can’t go wrong!
A little sea salt to taste may be added to the fresh cheese. You can add sea salt to the fresh milk prior adding kefir, or, fold a little sea salt in the fresh curd in step 4. Depending on preference, 1/2 tsp sea salt per 3 cups curd is about right.
The leftover sweet-whey [without any added sea salt] can be cultured with kefir grains to prepare Whey-Kefir. Kefir-whey and Whey-kefir are very much the same, so Whey-Kefir can be used in the same whey [way] as Kefir-Whey. Confused? GOOD!!
But first pass the leftover unsalted sweet whey through a sieve to remove any small curds. Cool the sweet whey to room temperature then kefir-eyes with kefir grains until your eyes almost pop-out of surprised eye sockets @|@— what this means is culture for 24 hours at room temperature, and then strain to separate the kefir grains from the Whey-Kefir. This makes a delicious refreshing beverage. It is rich in Methionine and Cystine, the health-promoting sulfur-containing amino acids. The latter help to produce the master antioxidant Glutathione in the liver. A healthy smoothie can be prepared with 2 Tbs of freshly ground linseed meal mixed with 1-cup Whey-Kefir.
Molded and Mature Kefir Cheeses
For some inspiration and ideas, enjoy the photos linked below to some cheeses that I’ve developed over the years, solely with kefir. These cheeses are quite easy to prepare … even a novice to cheese-making should find the processes reasonably simple and easy to do.
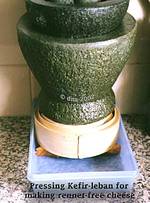
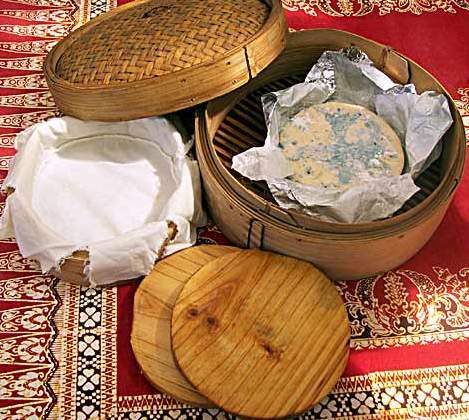
The first step for preparing most of the cheeses demonstrated below, is to prepare Kefir-Leban as explained above. Then, the kefir-Leban is pressed in a cheese form, which gives shape and form to the pressed fresh curd. Below is a photo of a Chinese or Asian bamboo steamer, which is quite suitable as a form for pressing fresh kefir-curd or Kefir-Leban. Bamboo steamers are inexpensive and readily available from most Asian Grocery stores.
A suitable size steamer [or cheese form] is lined with moistened cheese cloth, and then the cloth-lined steamer is filled with Kefir-Leban. The fresh curd is then wrapped with the remaining cheese cloth to seal the curd. A wooden disk [follower] that fits snug into the steamer is placed over the cloth-wrapped curd. Then the steamer [or cheese form] is placed in a suitable large wide container. A heavy weight is placed on top of the follower, and the curd is pressed for 24 to 48 hours. The pressed curd is removed from the cloth, which can now hold its shape and form. This is our base for making many types of cheese. This can be semi-matured or matured by first drying the freshly pressed curd on a wooden board. Molded cheese types such as kefir-blue, kefir-brie or a cross between the two varieties, including kefir-fetta [see kefetta below ] can also be prepared from this base cheese-product. The following photo shows a run-down of the whole process of pressing the fresh curd [Kefir-Leban].

The pressing procedure must be done with a sufficient heavy weight. It is the most important step. This is what makes the disk of fresh curd hold its shape and not fall apart and crumble. This is why rennet is used for common cheese making, for a rennet produced curd readily holds its shape with less weight and pressing. However, the reason why I do not use rennet is because it is either prepared from slaughtered un weaned ruminants. Most of today’s Microbial rennet also referred to as vegetable rennet is produced with Genetically Modified organisms. Non genetically modified rennet is available, although it may be difficult to find a good source.
The image to the left demonstrates two large granite mortars with pestles placed on top of each other, which is what I may use as a heavy weight source [about 15kg or about 35 pounds all up]. A bucket filled with water also makes a suitable weight.
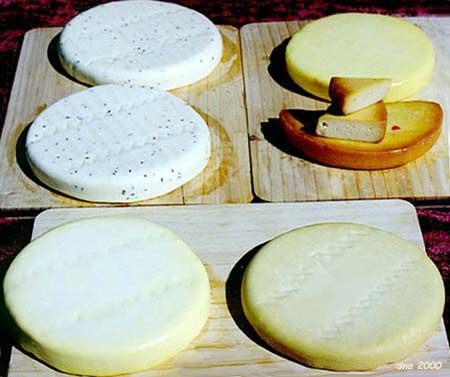
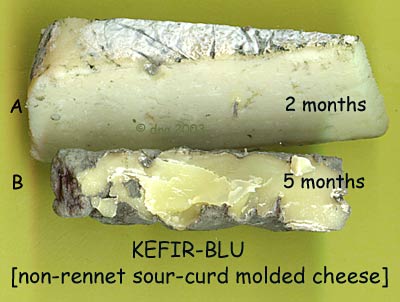
Next, demonstrates the pressed curds placed on wooden chopping boards at different stages during the drying process. Before turning the curd over each day, the top and side surfaces are first gently rubbed [buffed] with a clean piece of white cotton cloth, dipped in olive oil, or, salt solution, or in fact, diluted vinegar or any mixture of the latter two. After turning the curd over, any non-buffed exposed surface is buffed as above.
Note, the red coloured cheese [middle right of picture linked below], has chili flavoured sufu [preserved bean curd, sometimes referred to as Chinese cheese] folded into the original Kefir-Leban before the Kefir-Leban is pressed in a cheese-form. The first two cheeses [top left] had black un hulled sesame seeds folded in the Kefir-Leban, before pressing. I may include fresh or dry herbs or peppercorns etc. folded in with the fresh Kefir-Leban before pressing to produce some wonderful herb cheeses–
And finally, the semi-dry curds are dipped in melted beeswax to seal the curd and prevent further drying. The sealed cheese is matured at room temperature, or in the fridge or root cellar for an appropriate amount of time, depending on the type of cheese one wishes to prepare.
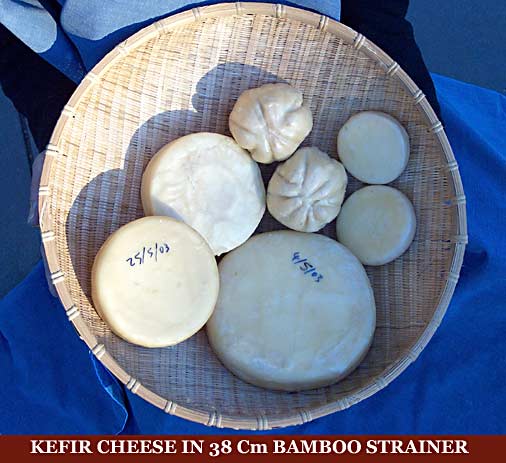
The No-Fuss No-Form Non-Press Method
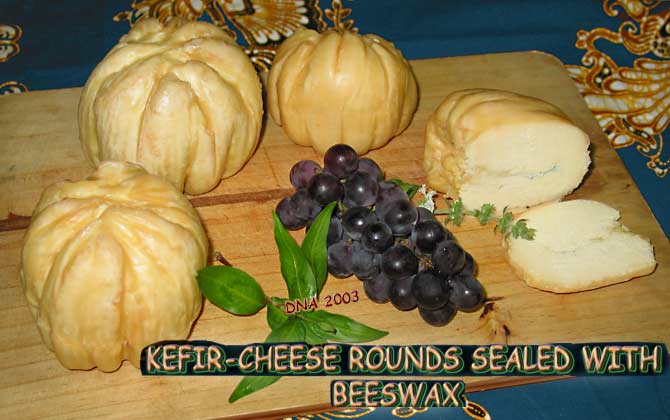
To the left is a photo of pure kefir-cheese rounds. These are simply prepared with fresh kefir, with 1 tsp of salt added to each 4 cups of liquid-kefir, or ready-to-drink kefir. The salted kefir is then draining in a cloth-bag as explained above, for about 7 days. Each day for the first 5 days, the curd is removed from the bag, and the bag is washed with boiling water. 1/4 tsp of salt is folded into the curd and the curd is placed back in the clean cloth, and drained. On day 5, the bag is twisted very tight to force the curd into a round shape. I use a setup where the hanging bad sits between two wooden dowels, so that the tightly twisted bag will hold shape without unwinding. The bag is tied in place with string between the two wooden dowels.
On day 7 the curd is carefully removed from the cloth bag, by which time the curd has dried sufficiently so it holds a round shape. The round curd is placed on a wooden board and dried for about 2 weeks. During this time, the surface of the curd-rounds is buffed each day by gently rubbing the entire surface of the cheese with a clean cloth dipped in a solution of salt, with a little vinegar added. However, extra virgin olive oil may be used instead. The curd forms a yellow crust at which point the cheese is ready to be sealed to prevent further drying by dipping the cheese-rounds in melted beeswax. The following kefir cheese-rounds have matured for several months–
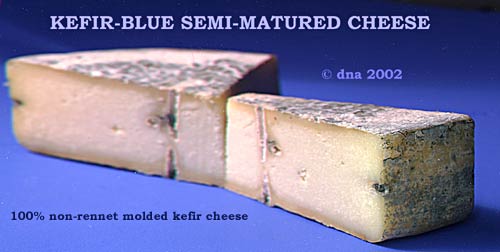
Blue, Brie or Camembert Molded Types of Kefir Cheeses
Blue, Brie and Camembert cheese types including a cross between these mold types made from kefir is quite simple. Such cheese can be prepared with Kefir-Leban, as a 100% kefir base explained above, which is pressed, inoculated and incubated to mature the cheese. The mold breaks down the more complex molecules of protein and fats, and impart the characteristic sharp taste to Blue cheese. That taste is due to the fungal metabolites, butyric acid and ammonia.
A more preferable base for a molded cheese, is to prepare the basic kefir cottage style cheese explained above, for this will produce a non acid molded cheese closer to the more common molded cheeses. I’ll explain the kefir cottage style cheese here to prepare molded cheese. One can simply substitute cottage style cheese for Kefir-Leban for a sour molded curd, creating interesting variations of Blue, Brie, Camembert or a cross between these.
The fresh curd of kefir cottage style cheese is pressed for 1 day, as explained above.
To inoculate the cheese with Blue mold [Penicillium roquenforte], I find a convenient method is to use some commercial Blue cheese. Or purchase the mold spores [See suppliers at the end of this page]. This is also the case with Brie or Camembert types [Penicillium candidum, Penicillium camemberti].
Simply scrape some blue mold from the center of a commercial brand of Blue cheese with a sterile knife [First pass the knife blade over a naked flame and let cool in a cup of pre-boiled cold water]. For a Brie or Camembert, scrape the rind of while mold with a sterile knife. In a clean cup, add 1 Tbs pre-boiled cold water, and mix the mold scrapings well with the sterile knife. This is your basic inoculant, or mold seed to inoculate the fresh curd, so that the correct mold strain will begin to grow on/in the cheese.
To inoculate a Blue cheese, dip the sharp tip of a bamboo or a sterile stainless steel shish-kebab skewer [sterilize as for knife above] into the liquid inoculant. Pierce the curd with the skewer to create air channels about a 2cm [1″] grid. Make sure to dip the skewer tip into the liquid inoculant before piercing each hole into the curd.
For a Brie or Camembert type cheese, simply prepare the inoculant as above, but scrape the surface of a commercial brand of your choice of Brie or Camembert cheese. However, with Brie or Camembert, the cheese is inoculated differently. The best procedure here is instead of piercing, evenly spread the inoculant over the entire surface of the pressed fresh curd with the sterile knife. Then incubate as per following.
To incubate, you can use an oven stainless steel rack to place the inoculated cheese, and let the cheese mature in an empty cooking oven until mold forms. Another idea is a large bamboo steamer, placing the inoculated fresh curd on the rack of the steamer, and then put the lid on the steamer. Within about a week or so, mold growth should be found on the cheese. In the case with Brie or Camembert, a fine carpet of white mold should form over the surface. At this point, wrap the cheese in waxed paper, and keep in the fridge in a plastic bag. Before wrapping, pierce the waxed paper with a needle, make holes in a 1cm [1/2″] grid. Then wrap the molded curd in the waxed paper and refrigerate. The cheese will be ready in about 2 weeks or possibly longer, depending on the mold type and the type of cheese you want to produce, including temperature and humidity.
For further interest, if a cross between white and blue mold types is what you want, try both methods for inoculation explained above, using the piercing technique for a blue, and the spreading of the inoculant over the surface of the fresh curd for the white mold such as Brie or Camembert. This produces interesting results, where the inner portion of the cheese is a blue cheese while the rind forms as a white Brie or Camembert mold. Before inoculation, try experimenting by partially drying the fresh curd on a wooden board, buffing the surface with salt brine each day over a 2 days or so. Then inoculate the cheese with mold with the appropriate mold type and method. This produced cheese with a slight translucent firm to hard quality, depending on how dry the fresh curd is, before inoculation.
Experimentation can give interesting results. Kids can be involved too, learning the basics of cheese making while having fun along the whey. Enjoying the final cheese altogether as a family, can be quite rewarding.

Cheddar-Type Kefir Cheese– Kefeddar
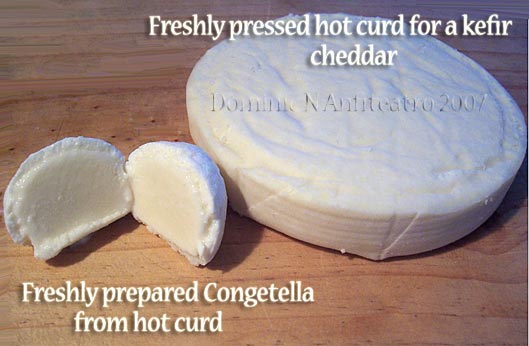
In a nut shell, the first stage to prepare a kefir cheddar cheese or kefeddar, is to prepare the recipe explained above for kefir cottage cheese. After the curd is drained in step 5 [drained for a few minutes only], the fresh warm or hot curd is salted [to taste] by folding or rubbing in a little sea salt into the curd with a spatula or with clean hands. The salted curd is placed in a suitable cloth and pressed in a Chinese bamboo steamer [or a suitable cheese form] with a heavy weight, pressing for about 2 days. The disc of fresh curd is placed on a wooden board and dried. Each day, the entire surface of the curd is gently rubbed [buffed] with a clean piece of white cotton cloth, first dipped in olive oil. The top surface of the curd is buffed first, before the curd is turned over, followed by buffing all surfaces. This is to prevent mold growth on the surface of the cheddar-type cheese as it dries.
Depending on thickness of the disk of fresh cheese, temperature and humidity, after 1 to 2 weeks the entire surface of the curd should form a firm, yellow rind. The semi-dry cheese is dipped in melted beeswax to seal, to prevent further drying. The cheese is matured for some months [or years ;-] in a temperature stable environment. An underground root cellar is best for this purpose, however, designating a wooden cupboard maintaining a reasonable constant temperature will suffice. In fact, the cheese may be matured in the fridge, didgeree doo to you, if you do 🙂
Kefetta
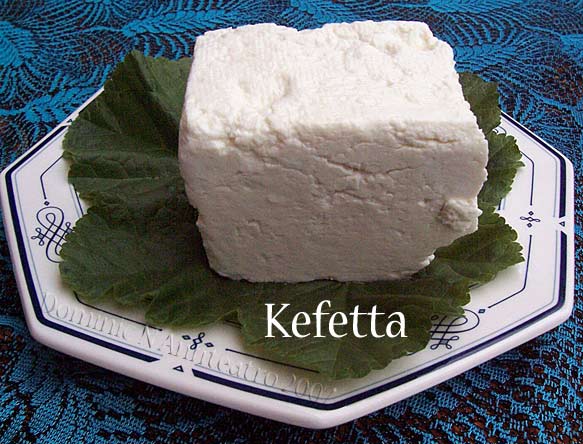
As the name suggests, a type of fetta cheese can also be prepared with pressed Kefir-Leban. After pressing Kefir-Leban in a bamboo steamer or a cheese form for 24 to 48 hours, cut the curd into blocks and store it in 7% to 12% salt brine with about 10% kefir or kefir-whey added to the salt brine. A 12% salt brine will keep the kefetta at room temperature for quite some time, a year or longer in fact. I prefer to leach out the excess salt from Kefetta before serving, by letting kefetta sit in fresh water for a day or so in the fridge, with a little kefir added to the water. This leaves a mildly salted wonderful delicious cheese. It can be eaten fresh or it can even be dried and matured, even after many months stored in salt brine. In fact, a lovely grating cheese similar to Parmegiano or Parmesan cheese can be prepared this way, by letting the cheese dry out until it turns hard.