
This web page explains how to make kefir include dairy-milk kefir, water kefir and other non-dairy kefir-related beverages. The following culture-products are cultured with kefir grains. Most of these products, which include Kefir d’erba medica, Kefir d’uva and Kefir d’ pollin were developed by yours truly. A recipe for preparing the infamous water-kefir or Kefir d’acqua is also represented. In addition, details for experimental and alternative methods for preparing kefir are shared here also.
Recipe for How to Make Traditional Milk Kefir
For 2-cups of Milk Kefir
- 1 to 2 tablespoons milk Kefir-Grains. To obtain kefir grains please go to Dom’s Cultured Products page
- 3 to 4-cup clean glass jar with lid.
- Nylon or stainless steel mesh strainer and spoon.
- Wide bowl to strain kefir into, and a clean sealable bottle to store the kefir.
- 2 Cups fresh milk – Suitable milk types: Raw non-pasteurised or pasteurised whole milk, fat-reduced, non-fat milk. Goat, Cow, Sheep, Buffalo, Camel and Mare’s milk.
Common Method for Making Milk Kefir
Place fresh kefir grains in clean glass jar.
It is wise to mark the out side wall of the jar with a permanent marker or an elastic rubber band, to indicate the volume of grains put in the jar. As your kefir grains increase over future batches, it shall be easy to tell the portion of grains to remove, for that portion will go above the mark. The removed portion are your excess, or spare kefir grains. These may be blended with kefir to amplify the probiotic and therapeutic value of kefir when consumed. Alternatively, use spare grains to brew other interesting, healthy culture-products, mentioned below.
Add fresh milk, place lid on jar, gently stir contents and let stand at room temperature for about 24 hours, or until the product thickens or sours to your liking.
Designate a spot away from direct sunlight for kefir fermentation, in a cupboard e.g. Do not fill the fermenting jar more than 3/4, otherwise the milk will overflow after some hours of fermentation. If the jar is sealed airtight, a slightly carbonated kefir results. Kefir is mostly prepared with the lid ajar, so that gas produced through fermentation is allowed to escape. It is usually best not to ferment for too much longer after the kefir shows signs of thickening, or separation seen as small pockets or layers of a pale-yellow liquid [whey]. Otherwise a sourer kefir results, and quite likely with separation becoming more prominent as 2 layers consisting of a thick white curd with whey at the bottom of the container. Note that this is not a bad thing, but it can make straining more difficult, and some folks may find it too sour for their palette.
Pour contents into a strainer and strain the kefir into a suitable container to separate the kefir grains from the liquid-kefir.
Wash the fermenting jar and reuse the kefir grains for a new batch by repeating the whole process.
What you’ve strained is kefir, or liquid-kefir. Store the liquid-kefir in a clean airtight sealed bottle.
Kefir may be consumed right away, or better still, store in a sealed bottle and refrigerate for a day or two before served chilled. Another option is to ripen liquid-kefir at room temperature for a day or more, preferably under airlock. It can then be refrigerated for longer storage or served as you wish. 1 to 2 days storage in the fridge or ripened at room temperature improves flavour and increases nutritional value. Vitamins B6, B 3 and B9 [folic acid] increase during storage, due to bio-synthesis of these vitamins mostly by yeasts of kefir grain organisms.
See section below Storing Kefir and Reducing Lactose for complete details about the ripening process, including ripening under airlock, which is by far the best method for maturing kefir.
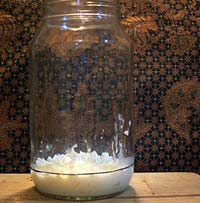
KEFIR FERMENTED for 24 & 48 HOURS
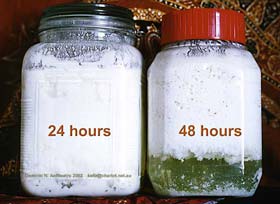
The kefir in the photo is brewing as per the common method explained above. Just prior straining, the contents is gently stirred to mix together curds and whey— those layers or pockets consisting of a thick white mass [curds] and pale yellow liquid [whey or to be more precise kefir-whey]. The colour of kefir-whey can vary. It may be similar as shown in the photo, or it can be a clear solution with little to no colour. Kefir-whey may even have a light-green hue. This depends on culture-factors, and the same milk may produce variable coloured whey.
Stirring the kefir right before straining makes straining a little easier. It usually gives the strained kefir better consistency. During fermentation, I gently rock the jar for about 5 seconds when ever I get a chance. This is done after the first 8 hours of fermentation. This action feeds the microflora of kefir grains by bringing lesser fermented milk to the kefir grain-organisms, while at the same time, inoculates portions of milk with the organisms that leave the surface of the grains.
NOTE The particular batch in the photo demonstrates the natural coagulation of milk through fermentation of kefir at 24 and 48 hours at about 22°C [71°F] room temperature. The ratio of grains-to-milk is about 1 part grains to 7 parts milk by volume [1 : 7]. This ratio is given as a general guide, for kefir may or may not coagulate exactly as shown in the photo, under similar conditions and volume of milk. Curd-character and appearance can certainly vary. Milk quality, the nature and the activity of the grains at that particular point in time, including temperature or season has much to do with the outcome. This particular batch is quite creamy. Observing the curd for small pockets of whey, tells me it’s ready to strain. Kefir can often turn out having a gritty mouth-feel. This may usually occur during mid-season, as the organisms are adapting to change in temperature [the microflora is trying to find its feet]. However, kefir with a gritty mouth-feel is not impaired in regards to health-benefit and nutritional value. Texture and consistency has more to do with the drinking pleasure of the beverage, and the majority of folks seem to prefer kefir with a smooth, creamy consistency.
My experiments show that if the temperature can be maintained constantly between 20° to 22°C, the best creamy smooth flavour, texture and consistency of the resulting kefir should prevail in each batch.
A 2-cup glass jar with non-agitated kefir [kefir that’s left undisturbed] fermented for 1 day at room temperature. At this point, most of the kefir grains are at the top of the kefir, and the kefir is cultured right through. This is when the kefir is ready to be strained in order to separate the grains from the liquid-kefir. The grains are then used to make a new batch of kefir.
Note those small pockets of whey [pale yellow liquid] among a mass of thick white curd. The grains in this batch were quite large, like walnuts. Curds initially form around each grain because milk is initially fermented at the surface of each kefir grain, moving away from the grain into the surrounding milk. This is due to greater populations of organisms on the surface of each grain [greatest culture-activity].
Misleading information on the internet explaining Kefir-Whey as being Kefiran
*Recently, I came across misleading information in regards to the separation of milk into kefir-whey and curds through fermentation of milk with kefir grains to produce traditional kefir. Some folks selling kefir grains are suggesting that the clear liquid [whey] is solely kefiran released from kefir grains into the milk. This is completely incorrect. The pale yellow or clear coloured liquid is simply whey, or kefir-whey in the case of kefir. Although kefir-whey does contain some kefiran, for kefiran is water soluble, however, by no means is it pure kefiran. The process of fermentation creates acidity, which causes the milk protein to separate [precipitate] from solution as a thick, white mass [casein or curd], among a clear, liquid solution [kefir-whey]. So no whey is kefir-whey solely kefiran.
To prove this, try this easy experiment, which many folks are probably already aware of. Add about 1 Tbs of an acidic liquid such as vinegar or lemon juice to 1-cup of warm fresh milk and note the spontaneous separation of curds and whey after a gentle stir. No kefir grains here to produce kefiran– yet, we have a clear solution separate from a mass of thick, white curds. In fact, we’ve just made fresh cheese!
Straining Kefir
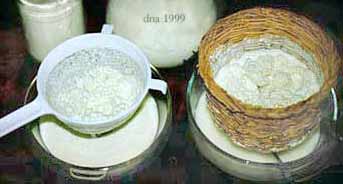
Once kefir has fermented to your liking, it’s time to separate the kefir grains from the liquid-kefir. This is best achieved by first placing a strainer over the open mouth of a wide container, and then pour the whole contents into the strainer. To help satisfy those who wish to use plastic or utensils mad from natural fibre, two types of strainers are shown in the photo, a plastic strainer [far left] and a hand-woven cane cheese-basket [far right]. Please see below for details regarding the types of strainers suitable for straining kefir.
After straining, the grains are placed back into a pre-washed fermenting vessel, without rinsing the grains. Fresh milk is added to the grains to culture the following batch. As a buffer, a portion of fresh kefir from the previous batch, may be included along with the fresh milk plus kefir grains to prepare the following batch. This process in known as continuous fermentation, and it is how kefir was traditionally prepared in the Caucasus.
Prior to adding fresh milk, a portion of previous kefir was always left in the leather bag containing the grains. Although this is not essential to do, but a method often I use. It helps by instantly reducing pH of the fresh milk that is added, which will inhibit unwanted organisms that may be present in the fresh milk.
The strained kefir is either consumed right away, or stored in a sealed container and kept in the refrigerator, or ripened at room temperature for a few days. Please see below for details regarding storing and ripening kefir, which is important if you want the best from your kefir.
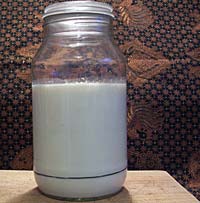
Freshly Strained Kefir
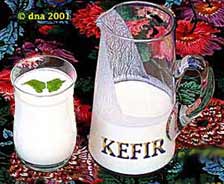
As one can see from the photo, kefir is a culture-milk beverage. Kefir has a creamy consistency, a slight to moderate sour refreshing taste with a very subtle carbonated tang. Kefir is easy to prepare and it may be cultured to your liking. Fermenting for a shorter period produces a less sour kefir. Longer fermentation produces more sourness, including using larger amounts of kefir grains. Experimentation is encouraged, and lends itself well to kefir making!
Kefir-curds have both a smaller surface area, and a smaller surface tension than yogurt. This renders kefir easier to digest, making it excellent as food for both adults and toddlers.[ 1] Kefir is also a nutritional aid and may be safely consumed before, during and after pregnancy and throughout lactation .
TYPES OF STRAINERS
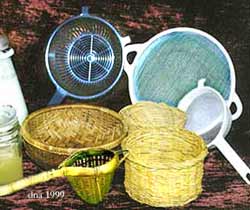
For those who prefer not to use plastic strainers for straining kefir, bamboo or cane or stainless steel strainers are quite acceptable to use. Such utensils are available from Asian stores in Chinatown etc. and the strainers may come rendered in various shapes and sizes.
The woven basket [front bottom right] is one that my late grandmother made by hand many years ago back in her native county, Italy. This handwoven cane basket was traditionally used to prepare fresh cheese and ricotta by my late grandmother and my mother in a small Italian village, where the family lived a life of self-sufficiency. The basket makes an excellent natural strainer. The photo also demonstrates some types of plastic and plastic-enamelled metal strainers available from cookware suppliers, K-mart or Wal-mart etc. Note the blue pasta colander [middle top of picture], which is also suitable for straining kefir. However, this type of colander is best used with larger kefir grains, for small grains will pass through the slots, and in no time you’ll lose all your kefir grains.
Notes When using bamboo or cane straining utensils to strain kefir, after each use, wash the utensil with hot water and set aside to dry. Bamboo or cane strainers may be sterilized with boiling hot water.
Metal Objects and Kefir Grains
This section is dedicated to the debate regarding kefir grains coming in contact with metal utensils. It is suggested that kefir grains should not come in contact with any metal object. This suggestion is made for both milk kefir-grains and water kefir-grains, or sugary kefir-grains [SKG]. This has become a firm suggestion with myth surrounding the claim, to the point that some folks have taken a strong stand to support this, without further argument– fanatical in fact. The suggestion that kefir grains should never com in contact with metal may be for a few practical reasons. Most importantly, this was quite valid regarding milk kefir-grains in the early 1900s, when the natural mother-culture was first introduced to the rest of the world. Back in those days, many home utensils such as sieves, spoons and pots were not made of stainless steel, a reasonably non-reactive metal.
Because milk kefir-grains are naturally acidic, the organic acids that are part of each kefir grain readily react with reactive metals. The important question is, which metals are reactive in the process of making and storing kefir? The answer is copper, brass, zinc, iron and aluminium are common reactive metals. If milk kefir-grains or kefir come in direct contact with any utensil made from any of the above, metallic ions of that particular metal can leach onto the grains, or into the kefir, where liquid-kefir is stored in containers made from any of these reactive metals. Daily long term ingestion of minute amounts of any heavy metal ion accumulate in the body, and can reach toxic levels.
However, stainless steel is quite inert and kitchen utensils such as sieves, spoons and bowls made from stainless steel are quite suitable for kefir making or for storing either water kefir or milk kefir. However, I personally would not use stainless steel containers to brew or store kefir, but rather use glass containers, for glass is the most inert, non-reactive material.
On the other hand, sugary kefir-grains [SKG] are non-acidic, so there is little to no reaction when SKG come in direct contact with reactive metals.
There were no stainless steel utensils readily available when milk kefir-grains were first introduced to the rest of the world in early 1900s. In this case, it was quite feasible that folks were warned that kefir grains or kefir should not come in direct contact with any [reactive] metal utensil of the day, such as brass, copper or iron strainers, spoons or bowls etc. This would have been to protect the consumer, and not that such metals would impair the quality of kefir grains, as has been claimed by fanatics. However, today, stainless steel kitchen utensils are readily available, so this claim is not as applicable as it once was [taking into account utensils made from reactive metals].
An Added Note for Further Interest or Debate. Under the right conditions, certain metals produce an electric current [electricity] in the presence of an acid. This is the principal behind lead-acid batteries, such as a car-battery produces and stores electricity [lead and lead-dioxide metal plates submerged in sulfuric acid]. In the case with milk kefir-grains, electrons passing through the microflora, due to small electrical current passing through the media when kefir grains are placed in a reactive metal strainer, may have been thought would interfere with respiration of certain organisms e.g., interfering with the entering into the Electron Transport System [ETS] in the Mitochondria of aerobic organisms of kefir grains. Please note that this does not mean that this is the case, but simply a possibility behind why the claim or myth of not letting kefir grains come in direct contact with metal, came about. This is apart from the fact that kefir will become contaminated with metallic ions where kefir is cultured, strained or stored in utensils made from a reactive metal.
Have you ever experienced a week electrical current felt as a subtle metallic taste on the tongue, when you put a metal spoon or fork in your mouth? This week electrical current produced is also the case when placing milk kefir-grains in a metal strainer, or where grains are held in a metal container as an example. A small electrical current is produced when kefir is stored in metal containers [including stainless steel pots and sieves]. As an example, 4 cups of milk kefir stored in a stainless steel bowl produced 150 milli-volts at 30 micro-ampere. In fact, a greater electrical current was produced, when kefir grains were placed in a stainless steel sieve [100gm milk kefir-grains sitting in a large stainless steel sieve, produced 250 milli-volts at 50 micro-ampere]. Under these conditions, such electrical currents *could have been thought would effect the microflora regarding ETS, as explained above.
More valid though, is the effect of electrolysis, which is what leaches metal ions from reactive metal objects such as copper, into the kefir itself. If such metallic elements are ingested regularly over time, the metal accumulates in the body, and long term exposure could reach toxic levels for the individual.
One other point; the mesh of metal strainers can cut into the delicate surface of SKG, which cause unnecessary damage, where SKG can break up into small pieces. Although this does not kill or impair SKG as such, but one can lose amounts of any small piece which easily pass through the mesh. However, this is quite unlikely to occur.
* There is no evidence to claim stainless steel strainers, spoons or other stainless steel utensil will damage or interfere with the microflora of kefir grains. We’ve used stainless steel strainers to strain kefir for years on end without any evidence to suggest that the grains or the microflora are impaired in any way what so ever.
Unpublished research has shown that culturing kefir-grains in a variety of metal containers, the grains increased more efficiently, compared to a control group. In this research, brass and aluminium [including plastic] containers were used as fermenting vessels. It concluded that culturing kefir grains in milk in brass containers, provided slightly better results in grain growth. However, this research did not evaluate whether or not culturing in metal containers as those mentioned, effected the rhythm of the microflora of kefir grains, or the liquid-kefir. Please note that this experiment was performed for research purpose! It is strictly unsafe to use either brass, aluminium including copper, sliver, zinc, and iron containers to either culture kefir, or, for storing kefir grains or liquid-kefir intended for consumption! Neither is it safe to use strainers made from any of those reactive metals to strain kefir!
The statements above are my personal findings and views unless stated otherwise. This topic is mainly expressed here in this fashion, for possible further debate, of for a better understanding. Especially to try and dispel a common myth that strongly suggests kefir grains should not come in contact with any type of metal. Stainless steel utensils are quite satisfactory and safe.
If one could use natural utensils e.g., cane or bamboo strainer and wooden spoons, then one may experience an appreciation of maintaining a relationship closer to nature. The Zen of Kefir Making, perhaps?
Rinsing Kefir Grains
In the past, and very likely to this day, when a person receive their first kefir grains, they were or are instructed to rinse their grains with water before they are used to make a new batch of kefir, just as I was instructed back in late 1978 when I procured my first batch of grains. In my research however, I came to understand, traditional kefir grains were never rinsed between each milk change by the tribes-folk of Caucasus [the original kefir masters]. In fact, early research suggests that rinsing milk kefir-grains interferes with the rhythm of the microflora found on the surface of the grains, due to how the organisms are arranged[ 1]
Most of this research was performed in the former USSR[ 2,3] during a period where kefir grains were used in the production of commercial kefir in that country including Poland, Ukraine and other countries. However, this is no longer the case in Russia and other countries, for today commercial kefir is made with artificial starters, instead of traditional kefir grains.
Rinsing kefir grains came about probably not long after the mother-culture was introduced to the rest of the world in early 1900s, possibly due to concerns of weed microorganisms settling on the grains because of lack of understanding of the culture’s protective abilities. However, the robust nature and antagonizing properties of the microflora, and possibly the physics behind the grains, are effective inhibitors against the growth of weed organisms. Because of the how the microbes are arranged over the surface of the grains, rinsing with water or fresh milk many of the wanted organisms are removed. Leaving lesser counts of essential organisms on the surface of the grains, may encourage weed organisms due to less competition. So it appears that microbe-phobia got the better of those who began this campaign, and also those who continue to rinse their kefir grains, or instruct others to do so.
I am able to exploit the protective property of kefir organisms, by implementing kefir as a natural preservative for preserving fresh foods in solutions containing as little as 10% kefir or kefir-whey, with exceptionally good results.
As long as utensils are kept clean and raw ingredients are fresh and of good quality, rinsing kefir grains is not at all necessary.
I try to leave intact on each kefir grain, as much of the water-soluble polysaccharide kefiran produced by the microflora of milk kefir-grains. The kefiran dissolves in the fresh milk and is found in greater quantity than if the grains were rinsed. When an amount of kefiran is readily available in fresh milk, increases the potential of inhibiting unwanted organisms including molds during fermentation of milk to produce kefir. Furthermore, kefiran is probably the most beneficial component of kefir on health, and rinsing the grains before adding them to fresh milk, decreases the amount of kefiran found in the finished kefir.
In Caucasus the grains were continually left in the leather bag, and not all the kefir was completely removed from the bag due to the crude method of straining used by the tribe-folk of this particular area where kefir originates. Amounts of previous kefir would always be present in the leather bag [as an acid buffer], before adding more fresh milk to the bag containing kefir grains. This is known as Continuous Fermentation. With this, the pH of the freshly added milk is instantly acidified [to about pH 5], and a hastened fermentation that follows, more effectively reduces the pH even further, which undoubtedly was most favourable for inhibiting unwanted weed organisms in their kefir.
Due to my research, I no longer rinse my kefir grains, as I used to do many years ago, because I was instructed to do so by the kind person who gave me the first amount of kefir grains. However, on the rare occasion, and only when necessary I fast my milk kefir-grains by soaking them in sterile water for a day. I find that this method is most effective in keeping kefir grains clean and healthy. The water-based compound solution strained from water-fasted milk kefir-grains, which I have come to name Kefiraride, has many practical applications, including the preparation of natural cosmetics, correct and control thrush [Candida albicans yeast infection], to increase the growth of sugary kefir-grains, to prepare a kefiran-rich yogurt, kefiran-rich kombucha, in bread making and making other baked goods, in making pancakes, ice-cream making, and the list goes on.
Exceptions to the No-Rinsing Rule
There are exceptions to any rule, including the no-rinsing rule, for sometimes rules are meant to be broken, intentionally or otherwise.
1. Kefir grains intended for drying for long-term storage as a back-up culture.
Milk kefir-grains should first be rinsed or bathed with sterile cold water before drying. This is to remove protein deposits from the surface of the grains after separating the kefir grains from the liquid-kefir through straining.
2. Reviving cross-contaminated or damaged milk kefir-grains.
Kefir grains that have become cross-contaminated with unwanted organisms or with Viili or Caspian Sea Yogurt [Matsoni]. Or, kefir grains that have been left in the same milk for extensive periods. In the latter case, the surface of each grain eventually becomes encrusted with a damaged, non-propagable layer of matrix, often seen as a yellow or yellow-orange colour, and the grains show signs of very little to no growth. To save or recover the growth-factor of damaged grains, I’ve discovered that one must act fast to remove the encrustation or the damaged surface material from each effected grain, doing so as soon as possible. The following can be applied to cross contaminated milk kefir-grains or damaged milk kefir-grains.
This is achieved by filling a clean bowl with pre-boiled body temperature water. Place a mesh-type sieve in the water, and then put the milk kefir-grains into the sieve. While holding the sieve with the grains under water, begin rubbing individual grains one-by-one, with a gentle abrasive rolling action against the mesh of the sieve, using two clean fingers.
This procedure will remove any unwanted or damaged non-growing matrix material from the surface of each grain. If the inferior surface layer is left intact for an extensive period, the grains shall eventually reach a point of no return where they become non-propagable [shall not grow]. This outcome is due to the fact that damage to each grain begins at the surface, which is exposed to the same acidic compounds for extensive periods [longer than 2 to 3 weeks at room temperature, depending on resilience of the grains, temperature and other factors]. The growth-factor at the surface of the grain becomes damaged first, possibly due to lack of nutrients in combination with long term exposure to acidic conditions including culture-byproducts produced by organisms. It may also be due to not enough kefiran, for I believe that the polysaccharide kefiran is a protectant for the organisms encased among the polysaccharide. The organisms among the damaged portion close to the surface of the grain no longer produce kefiran, or are unable to condense the kefiran so that the grain can form and grow.
At an early stage, at the centre of the grain ample kefiran is found, and that portion of the grain remains propagable. However, the grains as a whole show no sign of growth due to the unfavourable outer crust, slowly suffocating the inner organisms moving toward the centre of the grain. If corrective measures are not met within a given time, then such an encrustation or death of the matrix, spreads towards the centre of the grain like cancer, until the whole grain or each individual grain in the batch is infected right through each grain. The grains in this case shall never grow again, and can no longer be salvaged.
3. Grains that come in contact with a foreign surface or matter.
In this case, the grains should be rinse immediately with [preferably] sterile fresh water. If kefir grains fall a dirty floor, the gel-polysaccharide [kefiran], which exudes from the centre of the grain, may have foreign material such as dust adhere to the grain. Dirt may be removed from the surface by rinsing any effected grain with fresh, sterile water. In such cases after rinsing dirty grains, it would be best to eat the rinsed grain[s] instead of culturing in milk.
Storing Kefir to Increase Nutritional Value and Reduce Lactose
Traditional kefir grain-prepared kefir has superior keeping quality, unmatched by any commercial kefir variant.
If a mild, less sour kefir is what you want, then kefir can be enjoyed directly after straining to separate the kefir grains.However, ripening kefir by either storing the liquid-kefir in the fridge or kept at room temperature for up to two days before served, increases some of the B group vitamins, especially Folicin [Folic acid]. Liquid-kefir may be stored refrigerated in a clean bottle, and it should keep good for quite some time. Although, refrigerated kefir has a sourer flavour in comparison to storing for the same amount of time in the fridge. Ripening also increases aromatic compounds, improving the overall flavour of kefir.
A portion of kefir may be poured out from the storage bottle for ready consumption, and the container can be replenishing with freshly strained kefir of the day. Storage can be in the fridge, or at room temperature. We store kefir and consume it like so on an ongoing basis. We no longer store liquid-kefir in the fridge, instead we store liquid-kefir in a large glass bottle under airlock at room temperature– similar to brewing beer or wine. This is similar to how kefir was originally stored kefir masters of Caucasus. Large volumes of kefir was stored in large sealed wooden barrels or clay crocks, as it ripened during storage over many days in fact.
Experiment to observe keeping quality of liquid-kefir An 8-cup glass bottle was filled 3/4 full with freshly strained milk-kefir. This was left in the refrigerator for one year. At 12 months, samples were taken and the kefir was found to be still quite good, quite sour mind you, but nevertheless good. It had an alcohol content of approximately 2% with pH 3 [acidic similar to mild vinegar, or Kefirgar].
More Recent Experiment involved filling an 8-cup glass bottle with freshly strained kefir, and the kefir was stored for 10 months at room temperature. In this case, the bottle was 3/4 filled with kefir with the addition of 2 Tbs of extra virgin olive oil. The oil formed a natural airlock, preventing oxygen from getting into the kefir during room temperature storage. The layer of oil also creates a protective barrier, preventing the propagation of mold [and Flowers of Kefir] on the surface of the kefir. The kefir was sampled at 10 months and it was good, quite cheesy in flavour, but tolerable. This explains the extremely good natural preservative potential of traditional kefir, if ingredients are of good quality and utensils are sterile. Recall also that kefir has a powerful anti-oxidant, which with little doubt especially preserves fats of kefir.
No refrigerator in the house, teepee or tent?
Ripening Kefir at Room Temperature.
The method explained below will reduce a good portion of lactose in kefir, which is favourable for individuals keeping tabs on sugar or carbohydrate intake e.g., Diabetics or Low Carbohydrate Diet devotees. This method is the no-fridge method. It is by storing freshly strained kefir in a clean, sealed container, and the kefir is ripened [matured] at room temperature for a number of days. This method is similar to how the original kefir-makers of Caucasus stored their kefir, due to no refrigerators [Hence the need for, and, the development of– kefir!].
Individuals with concerns regarding the propagation of unfavourable organisms in kefir stored at room temperature.
A collection of scientific work with similar results, explain that disease-causing organisms, such as Listeria monocytogenes, less numbers of the organism survived when the culture-milk was stored at room temperature over refrigeration.[1] Separate research explains similar findings in regards to other strains of coliform or faecal bacteria such as the pathogen Shigella sonnei[2] including disease-causing viruses. Kefir-grain prepared kefir demonstrated a greater antagonistic effect against unwanted organisms and virus particles, compared to other culture milk-products.
Note this method of ripening produces kefir with lots of FIZZ! So please practice with care and with good common sense by implementing a blend of all your personal sensory perceptions in combination with common knowledge.
Freshly strained kefir [liquid-kefir] may be kept in a clean glass [or food grade plastic] bottle, stored at room temperature for up to two weeks in a cold climate, or up to five days in warm conditions. It is best to then refrigerate the kefir in a sealed bottle, consuming an amount each day taken from the bottle, as required.
Method
1. Pour freshly strained 12 to 24 hour kefir-grain cultured kefir in a glass or food-grade plastic bottle [do not fill any bottle more than 3/4 full].
2. Place a lid on the bottle but do not seal the container airtight.
3. *Each day, seal bottle airtight and give the bottle a good shake, and then loosen off the lid again to burp the bottle. This can be done twice daily.
An amount of kefir may be removed from the bottle to consume each day, until all the kefir from that bottle is consumed. Alternatively, after removing a portion of kefir for drinking, the bottle is replenished with that day’s freshly strained kefir. This can be a continual process over 1 week. At this point, wash the container clean with hot water and detergent and recommence the process with freshly strained kefir. Although I have personally done this over many weeks without washing the bottle and without a problem.
*The bottle is best shaken once or twice daily. This is to prevent Yeasts and vinegar-bacteria forming colonies on the surface of the kefir. With no agitation, such colonies may form a light-brown fuzzy carpet-like layer. This phenomenon is similar to Flowers of Wine [Mycodermia] in wine-making. In the case with kefir, I refer to the film as, Flowers of Kefir. Although the initial development of Flowers of Kefir is mostly regarded as safe, if left unchecked however, unwanted molds may propagate among the colony. Regular agitation prevents this potential problem. Please note that in my experience I have never found any mold on the surface of ripening kefir, by simply following the above suggestions. Ripening kefir under airlock is a superior method for brewing and should completely prevent the formation of Flowers of Kefir and any potential problem.
Ripening Kefir under AirLock
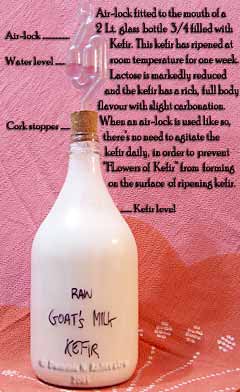
This photo demonstrates ripening kefir under airlock. An inexpensive airlock is fitted to the mouth of a glass bottle to prevent oxygen from getting into the kefir during ripening. The device is half filled with water, specified by a mark on the airlock [water level is visible in the photo]. Beer and wine making suppliers carry such airlocks.
Due to secondary fermentation, or continual fermentation, the process of ripening may produce a slightly sourer tasting kefir, with considerable increase in effervescence. Although, this process usually produces kefir with less sourness in comparison to kefir refrigerated for the same amount of time. Certain B group vitamins, Folic acid [Folacin] in particular, will increase as the kefir ripens over two days.
Kefir ripened under airlock as apposed to ripening in a sealed bottle, produces best flavour with less acetic acid, which otherwise gives kefir a drier sourer flavour. This is possibly because of lesser to no oxidation of alcohol [oxidation of alcohol produces vinegar]. Flavour including aroma is much improved during ripening as per the above comparison.
Folacin can be expected to increase by at least 116% in comparison to the original fresh milk and freshly stained kefir.[3]
Taking a Break From Making Kefir
… and Resting Kefir Grains
If for whatever reason one needs to take a break from culturing kefir for a short period, say between 3 days to 1 month, then there are a few options available to you. These depend on how long one intends taking a break. This also depends on whether someone is available as a baby-sitter for your kefir grains. If someone is available to baby-sit, then the first option below may be useful. Otherwise the second option may be followed instead.
1. The KEFIR BABY-SITTER METHOD
Resting Kefir Grains for One Week or Longer
For a Rest Period up to One Week
- Place the grains in a jar with the same amount of fresh milk that the grains usually ferment.
- Store in the refrigerator for 1 week in a sealed jar.
- Strain the kefir [which is safe to consume].
The grains are now ready to cultured per usual manner [Initial first few batches usually take longer than 24 hours to ferment at room temperature, until culture-activity increases and stabilizes].
The above process slows down metabolism of the organisms– they are forced into a semi-dormant state.
Resting Kefir Grains for Longer than One Week
Follow the steps in option 1 above, but strain the kefir refresh milk each week.
This option may be performed for as long as required. However, if it is carried over more than say, 2 to 3 months, there is the chance that the grains will not grow for some time. It may also damage the growth component beyond recovery. When resorting back to room temperature fermentation, the microflora needs a few batches to re-establish its activity, and the kefir will take longer to complete during this course. It may take anywhere between 2 to 7 batches for kefir grains to reach optimum activity again. The longer the resting period, the longer it takes for the organisms to reactivate fully. Simply let contents stand for the required time needed to produce kefir per batch. Another option is to use less milk to begin with, say 1 part grains to 3 parts milk, and change the milk each day, whether or not the first few batches show no sign of activity [fermentation]. There should be signs of activity increase within a few batches. At this point, use more milk, increasing to say, 5 parts milk, and then again within a few batches to say 7 parts and so on, until the amount of kefir prepared per batch meets your requirement.
2. The NON KEFIR BABY-SITTER METHOD
Resting kefir gains for longer than one week [You’re on your own, kefir-babies!]
As in option 1 above, but increase amount of milk by about 30% to 50% more for each additional week of rest. [Recommended maximum ratio preferably no greater than 1 : 30 grains-to-milk by volume].
I find that resting kefir grains as above, is safe to do for periods of up to 2 or possibly 3 months. Although I suggest that this option is performed for no longer than 1 month. For longer periods, I suggest that the grains are dehydrated for long term storage [See below for details].
NOTES During the rest-period, some species of bacteria and yeasts will reduce in numbers. Therefore a recovery period is required so that a balance between the different microbial components can be reestablish. The longer the grains were kept dormant, the longer the recovery period. In extreme cases, recovery may take up to 3 months. During this period, the kefir will vary in appearance, aroma, flavour, acidity, texture and consistency. See last paragraph in the above section Resting Kefir Grains for Longer than One Week for recovery tips.